
In our HTML beginner tutorial series, we’ve covered the basics of creating a website using HTML code. We’ve talked about tags, attributes and elements, shown you how to set up headings and paragraphs, discussed images and links, and even touched on how to create forms and tables.
Here is a recap of the concepts covered in the past three tutorials:
General:
- HTML stands for Hyper Text Markup Language, the standard markup language used by developers to create web pages.
- HTML is typically used in conjunction with JavaScript and Cascading Style Sheets (CSS).
- HTML files are simple text files. You can write HTML code using a text editor like Notepad++ or Wordpad.
- HTML files must be saved as plain text, with the extension “.html”.
Tags:
Tags define the basic structure of your HTML document, surrounding the content in your document and applying meaning to that content. Tags can be used to define words, lines, paragraphs, or even an entire document.
Opening tags appear between these symbols: < > and closing tags appear between these symbols </ >.
Types of tags commonly used in HTML:
- The <!DOCTYPE html> tag is a document type declaration, which tells the browser which type of HTML you’re using.
- The <html></html> tag tells the browser that everything between those tags is an HTML document.
- The <head></head> and <title></title> tags define the title of your document.
- The <body></body> tag defines the main content of the document.
- The tags <h1></h1> to <h6></h6> are used to define headings, with <h1> being the most important and <h6> being the least important.
- The <p></p> tag defines a paragraph of text.
- The <a></a> tag is used to define a link.
- The <img> tag is used to define an HTML image. There is no closing tag needed for the <img> tag.
Attributes:
Attributes are extra bits of information that you can add inside opening tags, contained within quotation marks.
Tags with attributes are written in the format: <tag attribute=”value”>Text</tag>. Attributes usually come in name and value pairs, for example: name=”value”.
For example, an image with size attributes added to define its width and height would be coded as follows:
<img src="https://blog.hyperiondev.com/wp-content/uploads/2018/10/Blog-Day-Life-HyperionDev-Student.jpg" width=”450” height=”200”>
Types of attributes commonly used in HTML:
- Link addresses are specified using the href attribute, together with the <a></a> tag. For example: <a href=”https://www.hyperiondev.com/”>Click this link to visit our website.</a>
- Text and images can be linked.
- HTML images are specified using the the src (image source filename) attribute, together with the <img> tag. For example: <img src=”https://blog.hyperiondev.com/wp-content/uploads/2018/10/Blog-Day-Life-HyperionDev-Student.jpg”>
- You can set the height and width of an image in pixels, using size (width and height) attributes. The dimensions are specified in pixels.
Elements:
Elements are the individual parts that make up a web page. Your HTML tags mark the beginning and end of each element, e.g. the content that appears between the <body> and </body> tags is the body element.
Lists:
- Lists are used in online articles, navigation menus, e-commerce website product features, etc.
- The <li></li> tag is a list item tag, which contains an item or point you are listing.
- Unordered lists (where the order does not matter) are coded using the <ul></ul> tag.
- Ordered lists (where the order is significant) are coded using the <ol></ol> tags.
- A nested list is a “list within a list” with a variety of different indentations defining points and sub-points.
Link targets:
- A target attribute tells the browser where the link should open.
- You can specify where to open a link by adding a target attribute to your code and applying a specific value.
- This determines whether you want the link to open in a new window, the parent frame, a named frame, etc.
Below is an example of a link that’s been coded to open in a new tab:
<a href="https://www.hyperiondev.com/human-mentoring/" target="_blank">Click this link to learn about our mentoring process.</a>
Alt attributes:
- The alt attribute provides alternate text for an image, informing your users (and search engines) what the image is about, which can be seen if there is a problem with loading the image.
The alt attribute would be added to the code following the image location URL, for example:
<img src="https://blog.hyperiondev.com/wp-content/uploads/2017/10/Blog-Day-Life-HyperionDev-Student.jpg" alt="Happy Student" width="450" height="200">
Tables:
- Tables can be a useful way of organising content on a web page.
- The <table></table> tag is used to define the beginning and end of a table.
- The <tr></tr> tag defines a row in a table.
- The <th></th> table defines a table heading.
- The <td></td> tag defines a cell of data in a table.
- The <caption></caption> tag can be used to give the entire table a caption, telling the user what the table is about.
- To add borders to your table and align the text, you would need to use CSS properties.
You can use HTML code to create tables with cells that span multiple columns, using the colspan attribute, or multiple rows, using the rowspan attribute.
Example of a table coded in HTML:
<table style="width:100%" border="1">
<caption>Daily Meeting Schedule</caption>
<tr>
  <th>Monday</th>
  <th>Tuesday</th>
  <th>Wednesday</th>
</tr>
<tr>
  <td>9AM conference call</td>
  <td>12PM working lunch</td>
<td>2PM brainstorming session</td>
</tr>
 <tr>
  <td>10AM keynote address</td>
  <td>1PM strategy session</td>
  <td>4PM management team update</td>
 </tr>
</table>
Forms:
- The <form></form> tag is used to define a form to collect input from users.
- There are various types of input elements like text fields, check boxes, radio buttons and submit buttons.
- The <input> element and type attribute are used to define a specific type of form element.
- Input types and names must appear inside quotation marks.
- The <br> tag adds a line break, which allows you to display text on a new line.
- The value attribute specifies the value of a form element.
Types of input commonly used in HTML forms:
- <input type=”text”> defines a one-line text input field, where the user is required to type something like their name or e-mail address.
- <input type=”radio”> defines a radio button, an icon representing a of a set of options. A user can only select one option at a time.
- <input type=”submit”> defines a submit button, which allows the user to submit the form data to a form-handler (a server page that processes the data). The form-handler is specified using the action attribute.
Example of completed form code (with input fields, radio buttons and a submit button):
<form action="/action_page.php">
First Name:<br>
<input type="text" name="firstname"><br>
E-mail Address:<br>
<input type="text" name="email"><br>
<input type="radio" name="diet" value="vegan">Vegan<br>
<input type="radio" name="diet" value="vegetarian">Vegetarian<br>
<input type="radio" name="diet" value="none">No dietary restrictions<br>
<input type="submit" value="Submit">
</form>
Test your knowledge
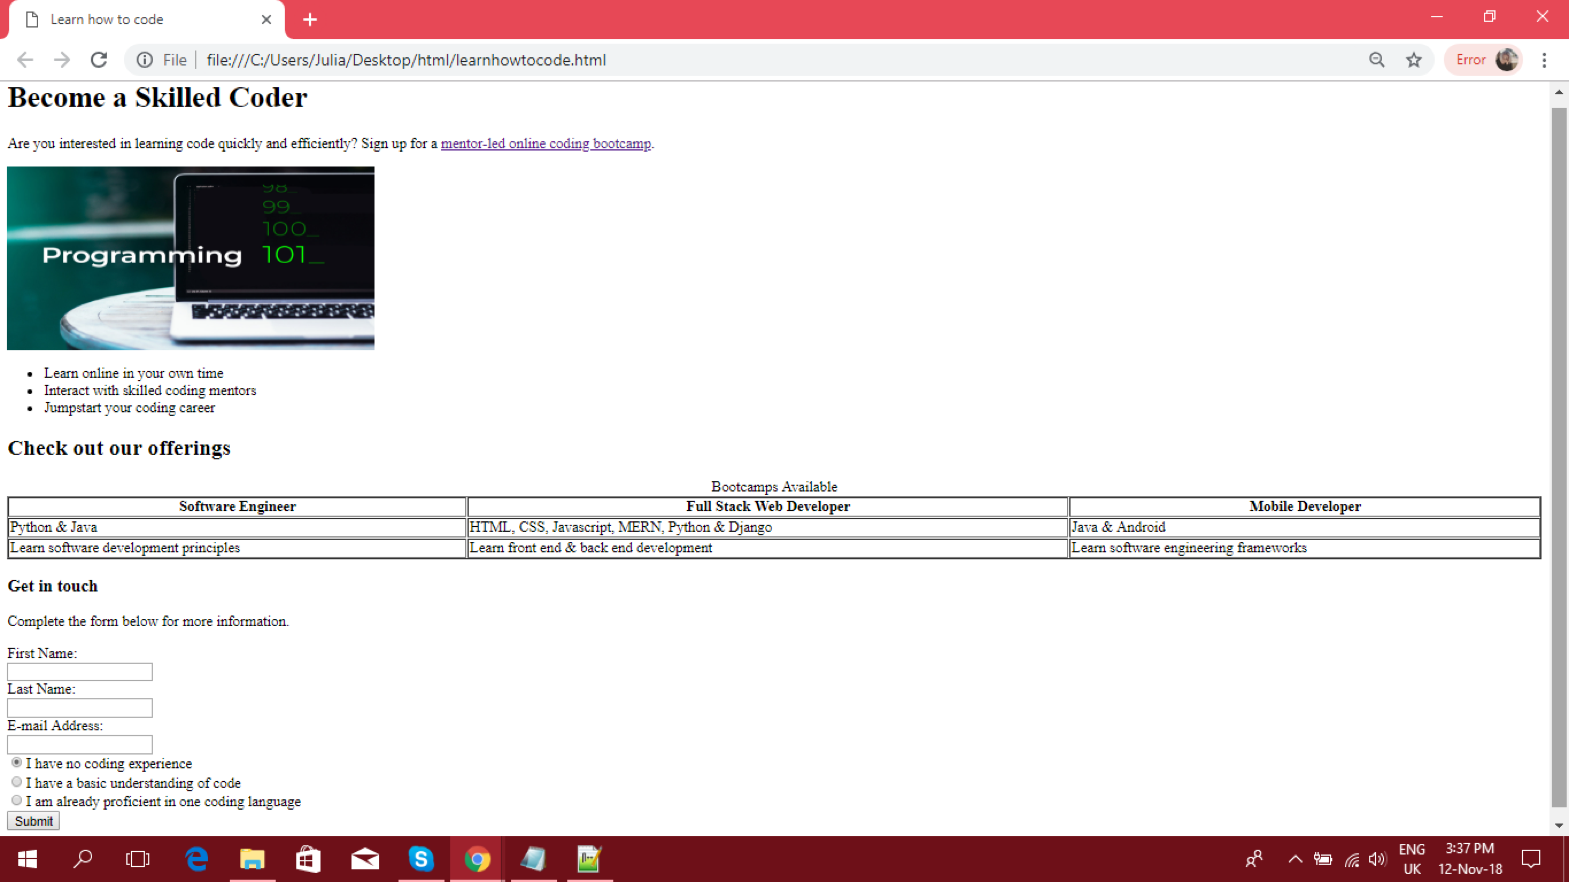
Use your new knowledge of HTML code to recreate the basic web page below, with headings, paragraphs, a linked image, a list, a table and a form.
URL: https://www.hyperiondev.com/courses/
Image source: https://blog.hyperiondev.com/wp-content/uploads/2018/11/Blog-Programming-101.jpg
If this HTML beginner tutorial has left you feeling inspired to go further, register for a Full Stack Web Developer bootcamp where you can learn HTML in more detail.
Check out our previous HTML tutorials:
